September 11, 2011

Background Concept : The Springs

Something that I made by complete accident, but wound up being very proud of.

The Springs by Chase Restrepo


  • This isn't how you should work, but I had a foreground that I drew this AROUND, and I rather liked the sketch, so I decided to take it beyond just that.
  • I put in the basic colors of each section after I finalized the composition.
  • After that, I darkened everything to give it the night time feel I wanted, and worked over that.
  • I added in layers of colors with different textured brushes until I got up to the highlights. I was very careful throughout this whole process to keep the many light sources consistent.
  • After all the painstaking work of adding on colors by scratch, I added in the actual bright light sources, and the brightest highlights.
  • Now I turned my attention to the water, and duplicated all the layers I had thus far, and flipped them over to resemble a reflection, applied a ripple filter, and did several other hours of tweaking and experimenting with it until I got it right.
  • I added some color adjustments over the whole thing and was done with.


Media: Photoshop, Photoshop basic and textured brushes
Time Taken: 6 hours approximately
Made in: February 2011

Rooster Painting

I don't really remember much about the making of this one, but it was basic and fairly simple process, as  used a different program from what I usually use. This is of the rooster I used to have. He had to give him up because he hospitalized one of our hens. (She has to stay for a weekend at the vet's office and everything) But he was sweet to humans, especially me.

Thought Behind Those Eyes by Chase Restrepo

Media: openCanvas 4.5 Plus, Basic brushes
Time Taken: 3 hours approximately
Made in: November 2010

September 9, 2011

Skulls and Glows

This one is a bit older, made for the concentration of my AP portfolio back in 12th grade. The idea was centered around Skulls.

Brimming by Chase Restrepo


  • First I set up what I was actually drawing. I started from observation, but obviously...my light source was a limited one, so I worked from a photo in the last half of completion. This is a real coyote skull with a green 6" glow stick set inside the mouth. Set on a glass top table for reflectiveness.
  • Again, I start with a black canvas and start to block in basic shapes in a very dark green, mapping out where the main areas needing my attention would be.
  • I gradually go in with brighter and brighter greens, attempting to match the actual colors as closely as possible without using blending modes.
  • I add on the final highlights after going through all the values of green. Between the upper/lower teeth, and inside the eye socket are the most lit up areas.
  • I go in and fix up some areas that need refining, but I didn't need to do much to this one, this is a very simple piece in ways of color and composition.


Media: Photoshop, basic brushes
Time Taken: About 3 hours
Made in: April 2009

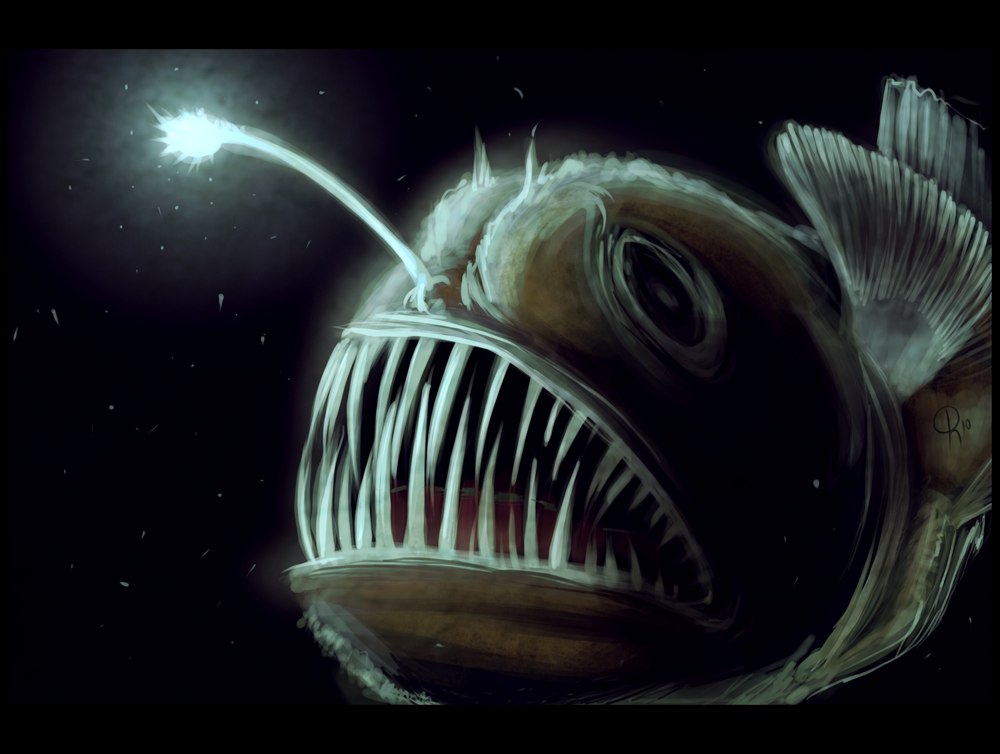
Angler Fish Speed Paint

I try my hand at speed painting every so often, I really ought to do it more. It's a great way of getting your hand and your eye used to getting down basic shapes and colors and ideas really fast, so the picture is more unified with a better and more gestural composition.

This was a really fast one that I clocked in as finished at 55 minutes.

Angler Fish by Chase Restrepo


  • This is no particular species, I just used two misc references that had colors I liked, so I picked those out and got to work.
  • I made a black canvas to start on. A lot of people prefer to use a midtone rather than the darkest dark right off the bat, that would have worked too.
  • I then started laying down a vague shape of the fish in a very light brown, and planned my light source(which is pretty obvious and straight forward in this one)
  • I built up to lighter and lighter shades of brown until I got up to a point where I felt comfortable adding the light blue highlights. I highlighted the bioluminescent appendage with a soft brush set to "screen mode" to set how bright I wanted the strongest light to be(this helps me make sure the highlights don't outshine the actual light source)
  • After all the lighting was done, I went bak in with smaller brushes and added texture to places like the fin, and around the edges of the fish where it would catch the light rolling off of it.
  • The final steps I took were adding some floating detritus in the water around the fish with a really small brush, and I set a texture over the whole thing. Minimal color adjustments were made after that.
Media: Photoshop, basic brushes
Time Taken: 55 minutes
Made in: October 2010

September 8, 2011

Sleeping Selina

I'll start things off with something I painted a while ago.

Comfort by Chase Restrepo

  • First I took a screen shot of my girlfriend all wrapped up in a blanket over a video skype chat.
  • The image was extremely pixelated, so I couldn't do much with it save for selecting colors from it. I decided to grid enlarged it to a larger size that I could work with, and added line clarity with my own lines.
  • The picture I took was too bright for what I wanted, so I selected my own colors for this, and laid down the basic dark tones that I would paint on top of.
  • I built up colors and colors until I got up to the brightest highlight(the highlight on the tip of her nose, I think was the brightest)
  • I added in the texture of the blanket with a very small brush, and I topped the whole thing off with some very slight color adjustments.

Media: Photoshop CS5, basic brushes
Time Taken: Not sure, but I think it was about 3+ hours.
Made In: September 2010